Sunday, December 29, 2013

Self Publishing? YIKES! | How to make a Picture Book in iBooks Author


How my iBook came to be

Besides being passionate about the fashion industry and interest in the truly talented people who create that world, a lifelong love and dream of mine has always been in making children's books. As with the film, animation and gaming industries, these two round out the top fields where an artist can make his or her mark and unleash their imagination and creativity to their fullest. At least, in my mind they do. 

When William was first created, self publishing was a completely different world. A little dubious to me and not an easy road to take. Thankfully, it seems the landscape of publishing had changed a great deal in the time since. A new, level playing field has emerged (well… kind of). Amazon with their Kindles, the Android from Google and Apple with their iPads opened a new market for books. Extraordinary… 

NOTE: Since publishing my iBook, I received a Kindle HD and a Nexus 7 for Christmas. Thank you, Santa! Can't wait to start developing books that work with those as well.

Anyhow, let's get started.

ANOTHER NOTE: You will have to forgive me if I gloss over bits or miss a step or two, I have never been a techie. I am lucky if I can put a table from IKEA together. I will do my best though and hopefully provide some useful insight that helps you on your way.
 
Challenge #1: Where to start?

Okay, so there I was with a complete book, story, illustrations and music. What now? Where do I start? What platform to choose? A background in graphic design made me most comfortable with Apple. With over 55 million iPad users as possible readers, I figured that wouldn’t be a bad choice to start with. Kindle Publishing was tempting but with a steeper learning curve, again, I thought Apple best to start.

YUP, ANOTHER NOTE: Speaking of Kindles, that will be my next adventure in publishing but I will save that for another post, hopefully in the near future.

Challenge #2: How the heck do I start?

I spent a good portion of time researching this question as I was rather clueless myself at this point. I bought a few iBooks I read good reviews about first. I wanted to see what others had done and after looking around, I felt pretty good I could produce something of equal quality.  Some of the most amazing books were actually Apps created by third party companies with proprietary software. The Pedlar Lady of Gushing Cross by Moving Tales, Inc. just blew me away. I highly recommend it. In the end for me, I choose iBooks Author with its simplicity of use. Creating Apps and the like will have to wait. Crawl before you walk and walk before you run. Here's a short list of what you need to do just that:

1.    An Apple ID and iTunes Account.
 
2.    Download iBooks Author (free)  

3.    In the USA, you need to purchase an ISBN number for your book for $150.00. Other countries vary so you must check that out if you are somewhere else. A lot of countries offer free ones. (lucky). Click here to see where I purchased mine. Apparently, there’s a monopoly.

4.    A story you need to tell and some illustrations. 

5. Now, onto the tricky part, maybe not for you, but like my hero, Winnie the Pooh, technology reduces me to a bear of very little brain. And please don't forget the most critical thing remember… bring lots of Hunny… (just kidding)


Challenge #3: The Tricky Part

Being used to working in Adobe’s InDesign, I found iBooks Author very simple actually. It was tricky because it was just unfamiliar and I kept looking to do things it couldn’t do. Like getting rid of the Table of Contents. Picture books don’t really need them. At this stage, I think you must spend some time getting familiar with the tools available. The Widgets are great for adding galleries, sound, etc. Once you know your way around a bit, spend some time thinking of how these tools might enhance your book.

Here are some key things to remember:

1.    Standard picture books in Print are 32 pages. If you are planning on a version for traditional publishing make sure you keep that in mind. Additional pages must be in multiples of 8. In the case of my book, I added a few more. One page you must account for is the Copyright page. Can't have a book without it.

2.    When creating art for iBooks, around 163 dpi works best for resolution on your iPad. Print is 300 dpi so create you original work at that resolution and “dumb” it down to 163 dpi.

3.    JPG format is the way to go, PNG works okay too but I discovered something. You can use a PSD file instead if you need a graphic with a transparent background, works much better than a PNG. (i.e. round buttons to overlay on top of an illustration.) 

4.    Fonts are an important aspect of your iBook as well. The good news is, it allows for the embedding of custom fonts. Rather than rehash this, here's the link from Apple itself.

5.    Music and sound must be in Apple’s ACC format, not MP3s.

Challenge #4:  What I actually had to do to make my iBook. 

Whenever faced with something new, despite my ambitions running amok, I apply the KISS philosophy (Keep It Simple, Stupid). There would be no cool page turning effects like I saw in other people’s books, no animated characters walking across the page, text dancing across the page, no fancy nothing. I kept telling myself next time, next book. The reality though I found was that most "iBooks" that contained these incredible features weren't iBooks at all but actually Apps from the Apple Appstore. (Selling these require an altogether separate account with iTunes)

My format was as such:

1.    Create a Book Cover – still not completely happy with the cover I created, while this decision is definitely a very important one, I could have went on forever deciding.
2.    Title Page with copyright and ISBN number (a very necessary evil)

3.    I choose a vertical- only (portrait) format. I developed my book on an iPad Mini. This seemed best for me. My illustrations fit better and allowed text to be far more readable. (larger)

4.    For that dreaded TOC (Table of Contents) I used the cover of my book as the background image and was lucky cos it worked without alteration.

5.    I made all my illustrations 768 wide x 1024 tall at 150 dpi. I spent a good deal of time tweaking the illustrations.

6.    I converted the music and sounds in Adobe Audition to Apple’s ACC format. I must give my sincerest thanks to Susan Poliniak for her amazing contributions to this book. Her music and sound effects were wonderful. I think you will agree. She is awesome!

7.    I went through two major rounds of edits on the story itself. Magic is in the editing I think. Hope one day to be proficient.

8.    I alternated pages. Text, picture, text, picture, etc.

9.    I closed with a short bio and a quick preview of my next book I am working on.

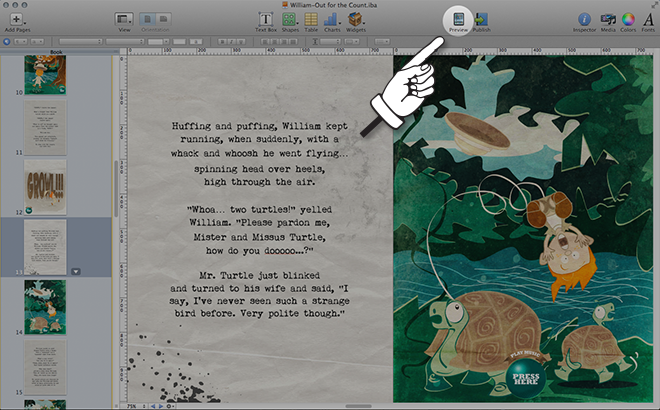
11.  During the whole process you can preview your book by hitting the Preview Button. I was a total dork about this. I just got such a kick seeing something I was making on the iPad screen.  The idea that it would be sold on iTunes (now the iBookstore) is super exciting. (Make sure your iPad is plugged into your computer when you do this.)

12. Back to sound, imported my files in and had a decision to make. Two prefab button/player option. Fairly standard, looked nice and clean, professional. Went with creating my own buttons using a PSD file.

13. You will need to create some additional assets for your book before you can publish:

• High resolution cover art. Mine was 1400 pixels by 1867 at 300 dpi resolution.

• 3 to 5 sample pages from your book using illustrations from your book. 

• A partial book preview file (iBook file). Allocate a portion of your book to potential readers to download free to entice them to buy. 

• Write a book summary to add your books page once live on the iBookstore. Make sure it includes keywords that help in searches on the web and within the iBookstore itself. No tags, just within your copy itself.

•  For a paid account, you will need a bank account to link to, your social security or tax ID number for W9 purposes. 

Your .iba file (iBook file)
 
14.  Review, review,review, proof, proof, an proof again. That’s it. All done. Well not quite, one more proofreading. WOOHOO! Done, what fun! Now what?


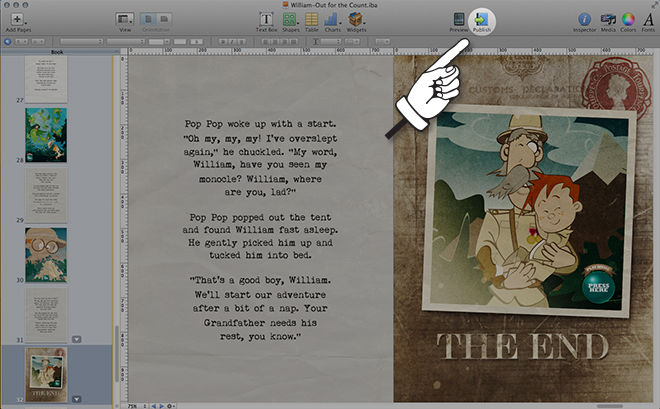
Challenge #5: Publish the thing already


Once you feel your book is ready for publication. You have tested it on your iPad, proofread it completely and make sure everything works and looks fine. You are then ready to launch, and feeling pretty excited, I know I was. Ready? Let's go publish!


1.    Hit the Publish Button in iBooks Author.

2.    It is fairly straight forward after that. You must choose between a paid or free book account. Are you giving you book away and setting a price for sale? In this process you will be asked to set a price. Some opt for the free account to give their work away. This might be great for creating free content for a blog or promotional material for a product or service. There is a philosophy this is good for unknown authors to get their work out and start creating a name for themselves that way. The latter may suit some but it wasn’t for me. After checking out what other have out on the market along with the price points, I decided to keep a lower price point, I choose $1.99 US. Keep in mind, Apple takes a 30% commission.

3.    Once you have decided, you will be prompted the rest of the way.

4.    Follow the prompts, fill out the necessary documentation to create an iTunes Connect Account.

5.    Download iTunes Producer, it will help compile your book and upload it to iTunes.

6.    Follow the prompts to upload all necessary files and you are done. Easy peasy, right?

7.    Please note: you will not receive a confirmation email or any other notification during this process. Maddening? Yup!

8. You eventually will  be able to track your sales through your new iTunes Connect account. There will be a “red light” under your new title there. Once it turns green, you book will be live and for sale. It took three weeks for mine to go live.

9.  Congratulations! You are now the proud poppa/momma of your very own iBook. A published author. 

The Final Challenge: The trickiest part of all, actually selling your new iBook

Here are the steps I’ve taken so far: 

1.    I promoted it on my Facebook page and Twitter account first. It is not that simple though.

2. Apple has a wonderful widget maker for you to create code for adding ads to blogs and web sites. The top right of my blog page here has one such ad. To create your own, here's the link.

3.    Next I created a new Twitter account just for my children’s iBook and illustrations. Further adventures in illustration and publishing can be followed there. @Wubbaweb 

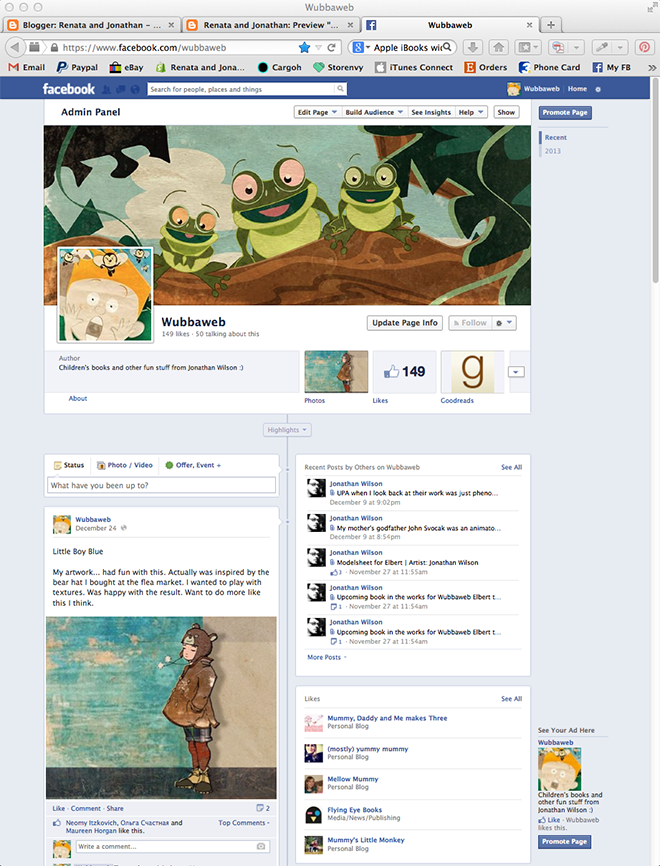
4.    Created a similar new Facebook page, also Wubbaweb


5.    I have a web site in development for a new Wubbaweb.com. Not ready yet but cannot wait to announce its launch. If anybody knows about Wordpress themes and how to customize them I would love your advice. That is the hold up. I am doing it on my own. All I can say on this front so far is "AAAAAAAAAAAAAHHHHH!"

 6.    I joined Goodreads.com and created an Author’s Account and launched a PPC (Pay Per Click) ad campaign netting me daily views totaling about 700 views so far.

 7.    After further research, they say reviews can help quite a lot. I would love nothing more than having a host of heavenly mommy bloggers descend to give me rave reviews until Oprah hears about it and then sales go through the roof. This requires time, a sincere approach and building such relationships.

When all said and done, I think of the process as an adventure. So much still to do but I think success requires a great deal of patience, thought and planning. Luck never hurts, but…most important…love.

If you have any questions, observations or advice I would thrilled to hear from you. If you are interested in reviewing the book for your own blog, magazine or newspaper, please contact me and I will send a promo code to you for a free copy. I am limited to 50 of them though.

I hope this post helps a little to those embarking down a similar path. I wish you much success!

Thanks for reading and hope your day is a magical one! 

xoxo

Jonathan

To purchase a copy of my iBook, please just click on one of the following countries where it is available (and you just happen to live). There are many so if you don't see one for where you live, please just leave a comment where you are from and I will see if it is available there and post a link for you. Please keep in mind the book is only in English at the moment.

Countries
USA, UK, Canada, Ireland, Poland, France, Austria, Germany, Italy, Japan, Czech Republic, Slovakia, Nederlands, Australia, Denmark, Cyprus and Argentina


Wednesday, July 31, 2013

Ted Baker A/W 2013 Lookbook | Fall Preview


Most happy again to bring you the latest from Ted Baker. What I love about Ted Baker's new fall collection most is... it's presentation, capturing the nostalgia, glamour and romance of the past, creating a story that blends perfectly with the line's wonderful aesthetic. Hope you enjoy it as much as I had presenting it.


Please click here to see the entire collection at Ted Baker. Cheers!


Thursday, July 18, 2013

Guest Post | Photographer Benjamin Kanarek | “Infinite Creation” for Harper’s Bazaar

About Benjamin Kanarek

Born in Toronto, Canada, where he grew up, Benjamin Kanarek fell in to many things by accident. Photography, Web Concept development and Creative Direction are just a few examples.

He played drums in a few punk rock groups, one of which was the “Existers” with the single “Telex Love”. Another, “the Poles” with Canadian Fine Artist Michaele Jordana. In the subsequent time frame, he entered Carleton University in Ottawa, where he studied Architecture and went on to work in several companies including WZMH Architects who were best known for designing the CN Tower in Toronto and Ron Thom who studied under Frank Lloyd Wright.

After a serious accident where he fell from a five meter mezzanine, he literally fell in to photography. Benjamin was never an assistant to another photographer, his second ever shoot was an advertising campaign in Toronto. He moved to Los Angeles and stayed there for just over a year and moved to New York. In New York, he shot quite a few campaigns for Macy’s, The May Company, Saks Fifth Avenue, as well as the Dayton Hudson Christmas book with Andie MacDowell, Elle MacPherson, Bitten Knudsen, Brooke Shields. He also shot several covers for VOGUE South America and VOGUE Mexico. He was the first Canadian photographer to ever shoot Kim Alexis for the cover of Chatelaine magazine.

He moved to Milan where he shot for Harper’s Bazaar and Cosmopolitan. He came back to Toronto where he shot for Sears and got back to Europe. After six weeks in Paris, he was given an opportunity to shoot the Haute Couture for L’Officiel Paris. Since then he has shot for several prestigious magazines and advertising clients.

Benjamin has worked with some of the classic Super Models like Kim Alexis, Elle MacPherson, Bitten Knudsen, Brooke Shields and also Angie Everhart, Laetitia Firmin-Didot, Kelly Lebrock, Roberta Chirko, Carol Alt, Helena Christensen, Kirsten Owen, Karen Mulder, Adriana Sklenarikova Karembeu, Janice Dickinson and recently with Du Juan, Alexandra Richards, Lydia Hearst, Irina Lazareanu, Daisy Lowe and Actresses, Andie MacDowell, Carole Bouquet, Vahina Giocante, Joséphine de la Baume, James Bond Girl Bérénice Marlohe…

Benjamin collaborates with Video and Co-Creative Director, Frédérique Renaut and shares his time between Paris and North America.

He has consulted as a Creative Director for world-wide agencies and clients.

In 2009, he launched “The BK Blog” with Frédérique Renaut as a response to a need expressed by more and more fans and photographers asking him advice about the inner field of the fashion photography business. (source: http://benjaminkanarek.com)


Dovile Virsilaite in “Infinite Creation” video directed by Frédérique Renaut 

Dovile Virsilaite dons Haute Couture in “Infinite Creation” for Harper’s BAZAAR by Benjamin Kanarek 


For the complete editorial, click HERE to visit Ben’s official site, click HERE
The Team Photographer: Benjamin Kanarek Model: Dovile Virsilaite at Oui Management Video Direction by Frédérique Renaut Styling by Vanessa Naudin Hair by Tié Toyama, at Calliste Make-Up by Carole Lasnier, at B-Agency Manicure by Lucia Cheptene, at B4-Agency Photo Assistants: Paul-Antoine Goutal, Claudia Waldmann at Studio Daguerre Stylist Assistants: Coline Peyrot Shot at the Studio Daguerre in Paris Post-Production: Ashish Arora


Friday, July 5, 2013

Interview with Michael Labica | Absynth Photographic


Absyth Photographic’s vision is certainly unique... The creative duo of Michael Labica and Sandrine Dulermo work hard to capture the magic a camera can summon under the brightness of light, or hidden deep in shadow. For over a decade, they have been experimenting to reach a certain perspective, to show a deep appreciation and concern for what is and what could be… beautiful. Even more so, they strive to make each feeling palpable... tangible.

The artists they work with must place their trust in them, for the duo fancy an ever-changing approach, setting out to capture the not-so-natural expressions… the unusual, all the while avoiding the mundane. Challenging talent with unusual styling, poses and designing sets often askew and off kilter. One must enter a world of momentary fantasy. Take risks… and play a game. Michael and Sandrine encourage the artists to challenge the norm and themselves… to reach for something more.

Practicing photography like craftsmen, treating the studio more like a laboratory, they challenge perspective, experiment and continuously seek new techniques to enhance their creative vision.


About Michael and Sandrine

By age 13, Sandrine was already smitten with photography. Preferring to skip school so she could run off to shoot her little brothers with her Zenith in the woods. By 18, she had her first campaign for a perfume company, which in turn, then led to her very first exhibition.

Michael, a former student from Louis Lumière, Paris, was first enticed by cinema but instead found him self learning the ropes as a creative working in the advertising world. Despite the fact he was never a model student, he learned his lessons quite well and soon developed and expanded an extensive list of corporate clients, but even in success, there was something missing.

Then Michael met Sandrine… a moment when everything seemed to fall into place and together they found expression through a lens, as a team their creativity sparked to new heights. London became their cradle of creativity and home. Their work and family life all take place in the heart of their beloved photo “laboratory,” Coconut Studios, which is located in West London.


Jonathan: A hypothetical... Harper's calls... has an exclusive preview of McQueen's 2014 Fall Collection, Sarah Burton wants... say Codie Young for the spread, the rest is up to you and Sandrine. What happens next? Could you tell us a little of the process going into a project from start to finish?

Michael: We will have a happy moment to start as we love Alexander McQueen.

I would imagine the idea would come quickly. We would start by creating the main character of the story and place it within the scene (i.e. where she would come from, how does she looks like, etc.). Inspiration comes from many sources (art, locations, movie, music, dreams, etc.). We would then draw a storyboard and source the suitable location.

If we decide to do a set build, we would design/make the entire scenery by working closely with our much-loved scenic painter/set builder, Jude Singleton. As we have our own studio, we have also the capacity to create, do the work on a specific set until we are completely happy.

On the day of the shoot, Sandrine would be behind the camera and I would be myself sorting out all the lights and ensure the set up is as originally envisioned. Our photo shoots always tend to be very hectic and ambitious, so it's normally a long day for us. After the shoot, we usually take a little bit of time before previewing at the images, we then do an editing and select our favourite images and then do our own post-production during our spare time.

Pre-Raphaelite | Amica
Model: Bianca O’Brien
Stylist: Marie-Louise Von Haselberg
Hair: Gerard Hawe
MUA: Jo Frost @ CLM

 Jonathan: The colour sense of your work is wonderful... playful and vibrant, what are your thoughts on colour and the importance it plays?

Michael: We both very much love black and white images so unconsciously, our use of colours is always full on. A very colourful image makes an amazing black and white.

In our minds, the extended use of colours bring our images somewhere between surrealism, exoticism and poetry. Surely not what you see in our everyday lives, the main idea is to create harmony, we mostly do a coloured fill light to create an artificial atmosphere.

Viva La Vida | Amica
Model: Agnes Sokolowska @ Modelwerk
Stylist: Laurent Dombrowicz
Hair: Keiichiro Hirano @ DWM
MUA: Marco Antonio @ DWM

Jonathan: As a professional can you tell us what was your big "AHA!!!" or possibly "Eureka!!" moment? The point where, maybe you weren't there yet but just knew you were on your way.

Michael: Our "big AHA" moment is probably when Sandrine and I originally met in a south-of-France photo lab. We both were on our way for a good life doing something we both loved doing… We can't however really say we've had our "Eureka" yet. We are still searching…

I envy Paolo Roversi, Sara Moon, Helmut Newton and few others for their distinctive styles!


Lily in the Sky with Diamonds | Plastic Dream
Model: Lily Cole @ Storm
Fashion Director: Neil Stuart
Hair: Garry Gill
MUA: Julie Jacobs @ One Makeup


Jonathan: Professionally, what is your camera of choice?

Michael: We own a Hasselblad H2, 80mm lens with and phase one digital back. Very basic, we like it for its simplicity and technically, there is no limitation, like on a SLR with shutter speed. Saying that, we are now very interested by the new Canon/Nikon as they are very flexible with the ISO.

Orient Express | Amica
Model: Hilda Lee @ Modelwerk
Stylist: Laurent Dombrowicz
Hair: Keiichiro Hirano @ DWM
MUA: Emma Miles @ Emma Davies


Jonathan: What was the most hysterically funny thing to ever happen on a shoot?

Michael: Well, I can't really think of anything specific to be honest, it's more about crying with us. They are so many stories I could come up with but they are always more dramas than hysterically funny moments on a shooting day.

Omaggio Cocteau | Italian Amica
Model: Luize Salmgrieze @ Elite Stockholm & Dave Norwell @ BMA
Stylist: Laurent Dombrowicz
Hair Christos Kallaniotis
Make Up: Phyllis Cohen @DWM

Jonathan: If you had a pick a favourite shoot so far, which would it have been? Why?

Michael: The one shoot I loved the most - not only for the images we created but also for the fun we had on the day was, in fact, a test shoot we did with actress Anna Friel.

We met Anna via our favourite make-up artist, Karen Alder. It was a summer evening at Anna’s house in Windsor. We started by a bottle of wine and end up drinking all night, David Thewlis singing Johnny Cash songs in his guitar.

From this moment, we end up shooting a "Gothic" themed story. Few months after, we found ourselves in the middle of the winter with freezing temperatures, shooting Anna in various locations from Oxfordshire to Windsor without any budget. Anna is a talented actress and we loved this experience. The images of this shoot, taken 7 years ago, never were published yet.

Gothic | Test Shoot
Model: Anna Friel

Jonathan: Okay, I am pretending to be a young photographer with more talent than sense (business sense for sure), what advice could you give me, something you wish someone had told you when you were starting out?

Michael: I would probably recommend becoming an assistant to the best photographer around you, it is the best way in. It might take a few years for you to fly on your own but you will be able to connect with so many people; from stylists to make-up artists, from models to publishing people, etc. Doing so, you may even end up testing with top assistant stylists.

Alessandra Ambrosio | Plastic Dream
Model: Alessandra Ambrosio @ DNA NYC
Fashion Director: Neil Stuart
Hair: Eamonn Hughes @ Premier
Make up: Kenny Campbell @ Premier


Jonathan: Thanks so very much, Michael, and thank you, Sandrine for spending a little time sharing your world and thoughts with us. Wish you much happiness and continued success. Cheers!

Michael: Thank you, Jonathan, it was a real pleasure to meet you.

To check out Michael and Sandrine's Coconut Studios click HERE
To see more of their amazing work, click HERE